cyxCoder
明天你会感谢今天奋力拼搏的你。
ヾ(o◕∀◕)ノヾ
Spring IOC容器中注入对象的7种方法
2020-02-19 10:45
1944
0
目录:
在此通过一个示例代码演示各种方式注入spring容器。
新建一个maven工程,pom.xml中加入如下依赖。
    <dependencies>
        <dependency>
            <groupId>org.springframework</groupId>
            <artifactId>spring-context</artifactId>
            <version>5.2.2.RELEASE</version>
        </dependency>
    </dependencies>

    <build>
        <plugins>
            <plugin>
                <groupId>org.apache.maven.plugins</groupId>
                <artifactId>maven-compiler-plugin</artifactId>
                <configuration>
                    <source>8</source>
                    <target>8</target>
                </configuration>
            </plugin>
        </plugins>
    </build>
再建一个简单的实体类User:
package com.cyx.demo.entity;

public class User {

    private String name;

    public User(){}
    public User(String name) {
        this.name = name;
    }

    public String getName() {
        return name;
    }

    public void setName(String name) {
        this.name = name;
    }

    @Override
    public String toString() {
        return "User{" +
                "name='" + name + '\'' +
                '}';
    }
}这种方式当然是最基础的,没啥好说的地球人都知道,如下在resources目录下编写一个applicationContext.xml
<beans xmlns="http://www.springframework.org/schema/beans"
       xmlns:xsi="http://www.w3.org/2001/XMLSchema-instance"
       xmlns:p="http://www.springframework.org/schema/p"
       xmlns:context="http://www.springframework.org/schema/context"
       xsi:schemaLocation="
        http://www.springframework.org/schema/beans
        http://www.springframework.org/schema/beans/spring-beans.xsd
        http://www.springframework.org/schema/context
        http://www.springframework.org/schema/context/spring-context.xsd">

    <bean id="user" class="com.cyx.demo.entity.User">
        <property name="name" value="张三"></property>
    </bean>
</beans>
然后编写一个测试类进行测试
public class Test {
    public static void main(String[] args) {
        //以xml的方式执行
        ApplicationContext context = new ClassPathXmlApplicationContext("applicationContext.xml");
        //打印spring注入的对象
        String[] names = context.getBeanDefinitionNames();
        Arrays.asList(names).forEach(name->System.out.println("beanName:"+name));
        //获取对象
        User user = context.getBean("user", User.class);
        System.out.println(user.toString());
    }
}
运行结果如下:
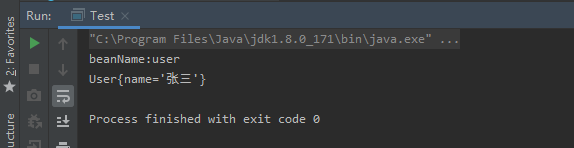
@Repository,@Service,@Controller注解其实底层都是用的@Component注解实现,只是做了分类而已。
扫包方式可以通过注解@ComponentScan,也可以通过xml配置文件配置,在此以注解@ComponentScan为示例。
首先,在User类上面加上@Component注解
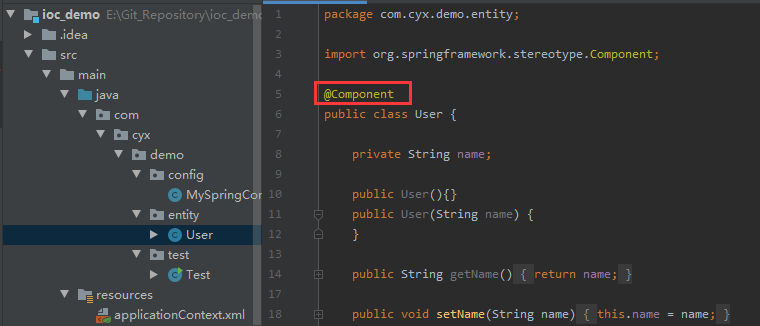
然后,建立一个配置类MySpringConfig,如下所示
package com.cyx.demo.config;

import org.springframework.context.annotation.ComponentScan;
import org.springframework.context.annotation.Configuration;

@Configuration
@ComponentScan(value = "com.cyx.demo")
public class MySpringConfig {

}
测试类改成加载配置类:MySpringConfig.class,以注解方式启动容器:
public static void main(String[] args) {
//以xml的方式执行
// ApplicationContext context = new ClassPathXmlApplicationContext("applicationContext.xml");
//以注解的方式执行
ApplicationContext context = new AnnotationConfigApplicationContext(MySpringConfig.class);
//打印spring注入的对象
String[] names = context.getBeanDefinitionNames();
Arrays.asList(names).forEach(name->System.out.println("beanName:"+name));
//获取对象
User user = context.getBean("user", User.class);
System.out.println(user.toString());
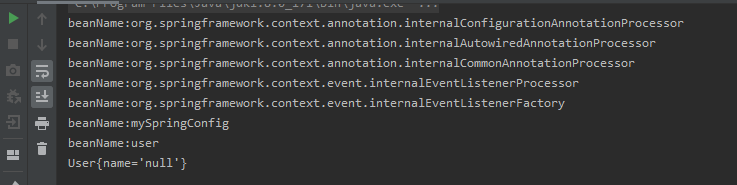
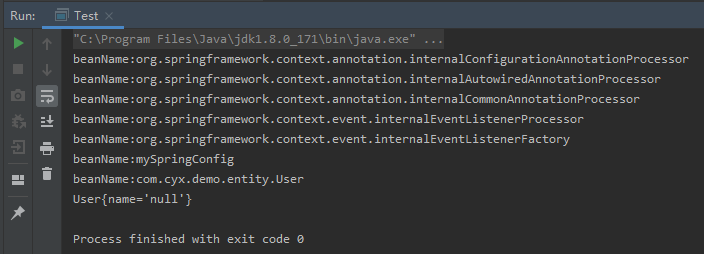
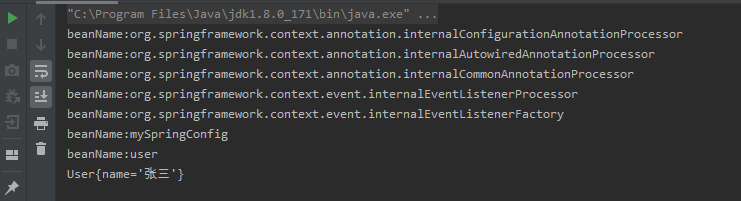
}结果如下图所示:
前面5个bean是spring以注解方式加载时内部注入的bean,在此不管,第六个mySpringConfig也被注入进来,这是因为@Configuration注解底层其实也用到了@Component注解。
然后可以发现用户没有赋初值,name为null,这个怎么办呢?可以用到@PropertySource注解和@Value注解,通过配置文件赋初始值。具体可参考:SpringBoot自定义配置文件详情(文章中大部分注解都是spring的,不需要springboot包)
@bean注解主要用来把第三方的代码(无法对其代码进行修改)注入到容器中来
依照第2种方法中的代码,把User类上的@Component注解去掉,然后在MySpringConfig中可以去掉@ComponentScan注解,然后加入@Bean注解,如下:
package com.cyx.demo.config;
import com.cyx.demo.entity.User;
import org.springframework.context.annotation.Bean;
import org.springframework.context.annotation.Configuration;
@Configuration
public class MySpringConfig {
@Bean
public User user(){
return new User("张三");
}
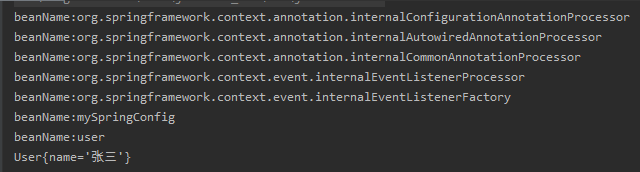
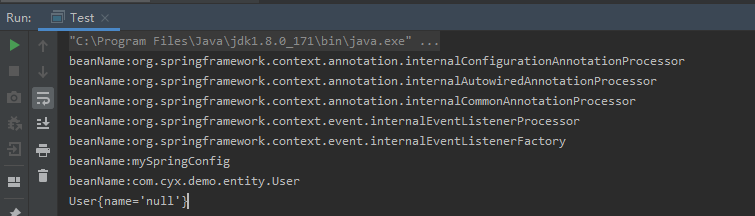
}执行测试类,结果如下:
同@bean注解一样,@Import注解主要的用法也是注入第三方的类到容器中。
依据上面的代码进行修改,MySpringConfig类中去掉@bean相关代码,增加@Import注解如下:
package com.cyx.demo.config;

import com.cyx.demo.entity.User;
import org.springframework.context.annotation.Configuration;
import org.springframework.context.annotation.Import;

@Configuration
@Import({User.class})
public class MySpringConfig {
}
运行测试类,报如下错误,但是打印spring注入对象中发现了一个com.cyx.demo.entity.User,这是因为@Import注解注入的beanName会加上包名。
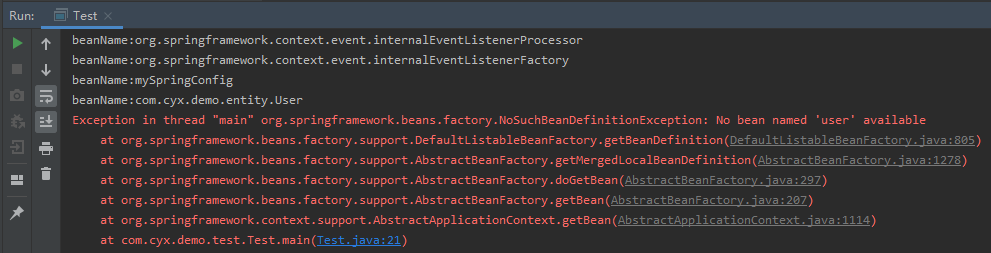
可以把测试类改成如下,通过全路径去取User对象。
public class Test {
    public static void main(String[] args) {
        //以xml的方式执行
//        ApplicationContext context = new ClassPathXmlApplicationContext("applicationContext.xml");
        //以注解的方式执行
        ApplicationContext context = new AnnotationConfigApplicationContext(MySpringConfig.class);
        //打印spring注入的对象
        String[] names = context.getBeanDefinitionNames();
        Arrays.asList(names).forEach(name->System.out.println("beanName:"+name));
        //获取对象
//        User user = context.getBean("user", User.class);
        User user = context.getBean("com.cyx.demo.entity.User", User.class);//获得通过@import注解注入的对象
        System.out.println(user.toString());
    }
}
运行结果如下:
没有进行参数初始化可以按照第2种方法中说的,通过配置文件注入初始化参数。
ImportSelector接口是对@Import注解的扩展,通过其进行批量的配置,或者通过代码动态返回注入对象,在此仅简单的编写一个示例类。
新建一个MyImportSelector类实现ImportSelector接口,如下:
package com.cyx.demo.config;

import org.springframework.context.annotation.ImportSelector;
import org.springframework.core.type.AnnotationMetadata;

public class MyImportSelector implements ImportSelector {
    @Override
    public String[] selectImports(AnnotationMetadata annotationMetadata) {
        return new String[]{"com.cyx.demo.entity.User"};
    }
}
selectImports方法返回的就是数组形式的注入类的全路径名称。
然后MySpringConfig中Import改成导入上面的接口实现类:
package com.cyx.demo.config;

import org.springframework.context.annotation.Configuration;
import org.springframework.context.annotation.Import;

@Configuration
@Import({MyImportSelector.class})
public class MySpringConfig {
}
执行测试方法,结果如下:
它通常和@Configuration配合使用,在@Configuration之前已注册的Bean,可以由ImportBeanDefinitionRegistrar接口来处理。
registerBeanDefinitions方法中的参数解释:
AnnotationMetadata importingClassMetadata:可以拿到@Import的这个class的注解元数据。
BeanDefinitionRegistry registry:可以拿到目前所有注册的BeanDefinition,然后可以对这些BeanDefinition进行额外的修改或增强。
registerBeanDefinitions方法中的参数解释:
AnnotationMetadata importingClassMetadata:可以拿到@Import的这个class的注解元数据。
BeanDefinitionRegistry registry:可以拿到目前所有注册的BeanDefinition,然后可以对这些BeanDefinition进行额外的修改或增强。
在此因为BeanDefinitionRegistry可以对对象进行注册,所以虽然不是非常规操作,用此方式进行注入也是可行的,具体代码如下,新建一个MyImportBeanDefinitionRegistrar类实现ImportBeanDefinitionRegistrar接口,代码如下:
package com.cyx.demo.config;

import com.cyx.demo.entity.User;
import org.springframework.beans.factory.support.BeanDefinitionRegistry;
import org.springframework.beans.factory.support.RootBeanDefinition;
import org.springframework.context.annotation.ImportBeanDefinitionRegistrar;
import org.springframework.core.type.AnnotationMetadata;

public class MyImportBeanDefinitionRegistrar implements ImportBeanDefinitionRegistrar {

    @Override
    public void registerBeanDefinitions(AnnotationMetadata importingClassMetadata, BeanDefinitionRegistry registry) {
        RootBeanDefinition rootBeanDefinition = new RootBeanDefinition(User.class);
        registry.registerBeanDefinition("user",rootBeanDefinition);
    }
}
然后MySpringConfig中Import改成导入上面的接口实现类:
@Configuration
@Import({MyImportBeanDefinitionRegistrar.class})
public class MySpringConfig {
}
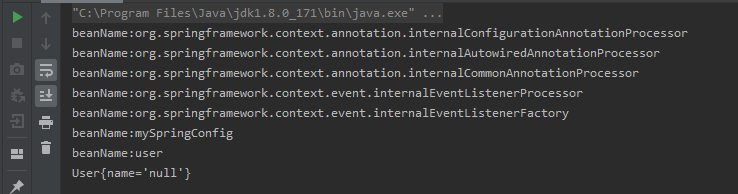
因为上面接口中是用beanName是"user",所以用"user"获取对象,执行测试方法如下:
FactoryBean是一个工厂Bean,可以生成某一个类型Bean实例,它隐藏了实例化bean的复杂细节,可以让我们自定义Bean的创建过程。
如下所示,新建一个MyFactoryBean实现FactoryBean接口
package com.cyx.demo.config;

import com.cyx.demo.entity.User;
import org.springframework.beans.factory.FactoryBean;

public class MyFactoryBean implements FactoryBean<User>{
    //返回的对象实例
    @Override
    public User getObject() throws Exception {
        return new User("张三");
    }
    //Bean的类型
    @Override
    public Class<?> getObjectType() {
        return User.class;
    }
    //true是单例,false是非单例
    @Override
    public boolean isSingleton() {
        return true;
    }
}
然后MySpringConfig修改为如下:
package com.cyx.demo.config;

import org.springframework.context.annotation.Bean;
import org.springframework.context.annotation.Configuration;

@Configuration
public class MySpringConfig {
    @Bean
    public MyFactoryBean user(){
        return new MyFactoryBean();
    }
}
执行测试类,结果如下:
全部评论