cyxCoder
明天你会感谢今天奋力拼搏的你。
ヾ(o◕∀◕)ノヾ
SpringBoot自定义配置文件详解
2020-02-12 17:06
2692
0
在springboot实际项目开发中,我们肯定不会把所有的配置信息都写在application.yml或者application.properties里,这样会显得文件中配置繁多且不易管理和维护。
怎么加载配置文件呢?在以前的JavaEE项目中,可以通过写一个配置文件工具类来加载配置文件。而当前基于springboot开发有没有更优雅的方式呢?当然就是通过springboot提供的加载方式对配置文件进行加载。
本文介绍两种方式加载自定义配置文件:一、是通过注解的方式;二、通过管理配置文件的扩展接口;
一、通过注解的方式
首先介绍第一个注解@PropertySource:加载指定的配置文件(默认只能加载properties文件,加载yml文件只能以键值对方式配置,树形结构配置加载的是叶子节点),加载后配置存储于springboot的环境(Environment)中。
此注解一般要和@Component或者@Configuration一起使用,以便扫包和注入。
@PropertySource属性介绍:
- value:指明加载配置文件的路径。
- ignoreResourceNotFound:指定的配置文件不存在是否报错,默认是false。当 设置为 true 时,若该文件不存在,程序不会报错。实际项目开发中,最好设 置 ignoreResourceNotFound 为 false。
- encoding:指定读取属性文件所使用的编码,我们通常使用的是UTF-8。
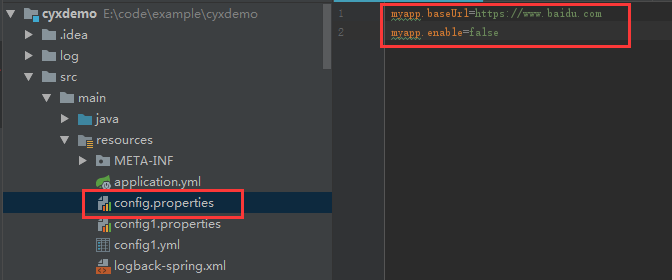
说了这么多,还是直接上代码最直观,怎么创建工程就不多说了,在此先建立一个config.properties文件,随意配置了2个参数myapp.baseUrl和myapp.enable。
然后新建一个Costant类
import org.springframework.context.annotation.Configuration;
import org.springframework.context.annotation.PropertySource;

//@Component
@Configuration
@PropertySource("classpath:config.properties")
public class Constant {

    public static String baseUrl;

    private Boolean enable;

    public String getBaseUrl() {
        return baseUrl;
    }

    public void setBaseUrl(String baseUrl) {
        Constant.baseUrl = baseUrl;
    }

    public Boolean getEnable() {
        return enable;
    }

    public void setEnable(Boolean enable) {
        this.enable = enable;
    }
}
然后创建一个Controller用来做测试,如下:
import com.cyx.demo.config.Constant;
import org.springframework.beans.factory.annotation.Autowired;
import org.springframework.beans.factory.annotation.Value;
import org.springframework.core.env.Environment;
import org.springframework.web.bind.annotation.RequestMapping;
import org.springframework.web.bind.annotation.RequestMethod;
import org.springframework.web.bind.annotation.RestController;
@RestController
public class DemoController {
@Autowired
private Environment env;
@Autowired
private Constant constant;
@Value("${myapp.baseUrl}")
private String baseUrl;
@Value("${myapp.enable}")
private String enable;
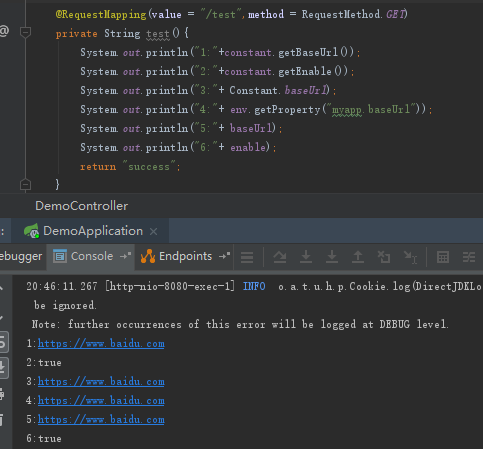
@RequestMapping(value = "/test",method = RequestMethod.GET)
private String test(){
System.out.println("1:"+constant.getBaseUrl());
System.out.println("2:"+constant.getEnable());
System.out.println("3:"+ Constant.baseUrl);
System.out.println("4:"+ env.getProperty("myapp.baseUrl"));
System.out.println("5:"+ baseUrl);
System.out.println("6:"+ enable);
return "success";
}
}调用test,得到输出如下:
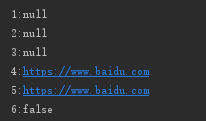
通过输出结果可知cnstant没有被注入参数,但是通过@value注解和Environment环境对象都能获得值,说明@PropertySource注解已经把配置载入了spring环境中。那么再怎么把参数注入到Constant类中呢?毕竟通过@value方式对于配置无法做到统一管理。
在此就要用到另一个注解@ConfigurationProperties:告诉SpringBoot将本类中的所有属性和配置文件中相关的配置进行绑定。
@ConfigurationProperties属性介绍:
- prefix:配置统一前缀,本类下的属性会加上前缀与配置文件中的配置进行--对应。
- ignoreInvalidFields:当为属性配置错误的值时,而又不希望 Spring Boot 应用启动失败,可以设置 ignoreInvalidFields 属性为 true (默认为 false)
如果我们希望配置参数在传入到应用中时有效的,我们可以通过在字段上添加 bean validation 注解,同时在类上添加 @Validated 注解。
按说明修改Constant类增加@ConfigurationProperties注解,如下:
import org.springframework.boot.context.properties.ConfigurationProperties;
import org.springframework.context.annotation.Configuration;
import org.springframework.context.annotation.PropertySource;
import org.springframework.stereotype.Component;
import org.springframework.validation.annotation.Validated;
import javax.validation.constraints.NotBlank;
import javax.validation.constraints.NotNull;
//@Component
@Configuration
@PropertySource("classpath:config.properties")
@ConfigurationProperties(prefix = "myapp")
@Validated
public class Constant {
@NotBlank public static String baseUrl;
@NotNull private Boolean enable;
public String getBaseUrl() {
return baseUrl;
}
public void setBaseUrl(String baseUrl) {
Constant.baseUrl = baseUrl;
}
public Boolean getEnable() {
return enable;
}
public void setEnable(Boolean enable) {
this.enable = enable;
}
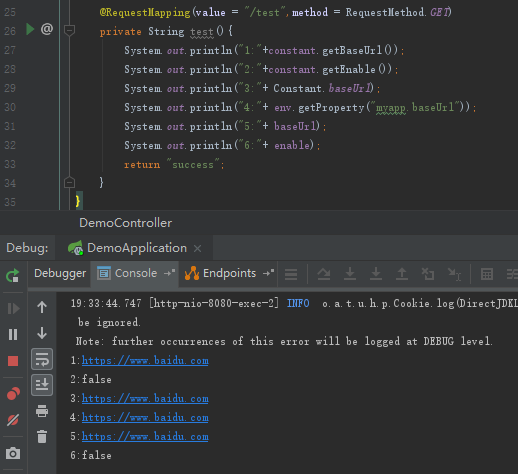
}然后重新启动服务,调用test接口,打印结果如下:
二、通过配置文件管理的扩展接口
1、实现EnvironmentPostProcessor接口
import org.springframework.boot.SpringApplication;
import org.springframework.boot.env.EnvironmentPostProcessor;
import org.springframework.core.env.ConfigurableEnvironment;
import org.springframework.core.env.PropertiesPropertySource;
import org.springframework.core.env.PropertySource;
import org.springframework.core.io.ClassPathResource;
import org.springframework.core.io.Resource;
import java.io.IOException;
import java.util.Properties;
/**
* 在运行SpringApplication之前加载配置文件到Environment环境中
*/
public class MyEnvironmentPostProcessor implements EnvironmentPostProcessor {
//Properties对象
private final Properties properties = new Properties();
@Override
public void postProcessEnvironment(ConfigurableEnvironment environment,SpringApplication application) {
//自定义配置文件
String[] profiles = {
"config1.properties",
};
//循环添加
for (String profile : profiles) {
//从classpath路径下面查找文件
Resource resource = new ClassPathResource(profile);
//加载成PropertySource对象,并添加到Environment环境中
environment.getPropertySources().addLast(loadProfiles(resource));
}
}
//加载单个配置文件
private PropertySource<?> loadProfiles(Resource resource) {
if (!resource.exists()) {
throw new IllegalArgumentException("资源" + resource + "不存在");
}
try {
//从输入流中加载一个Properties对象
properties.load(resource.getInputStream());
return new PropertiesPropertySource(resource.getFilename(), properties);
}catch (IOException ex) {
throw new IllegalStateException("加载配置文件失败" + resource, ex);
}
}
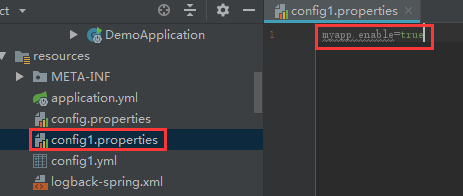
}2、再创建一个config1.properties文件,配置参数myapp.enable=true
3、在classpath下创建META-INF/spring.factories
配置:org.springframework.boot.env.EnvironmentPostProcessor=(EnvironmentPostProcessor的实现类路径)

4、重启服务,调用test接口,输出结果如下:
可以看出,config1.properties配置的myapp.enable把config.properties中的值给覆盖了。即实现EnvironmentPostProcessor接口而注入的配置属性会覆盖@PropertySource注入的同名配置属性。
参考文献:
全部评论